


Automating Email Hard Bounce Management in B2C Marketing with Dynamics 365
How to Tackle Email Hard Bounces and Maximize Reach in Your B2C Campaigns

 next to it, indicating an undelivered message. In the background, include icons or representations of marketing tools like email, SMS, and push notifications, symbolizing multi-channel communication. The overall feel should convey the concept of handling and resolving email delivery issues in marketing campaigns.")
In the world of B2C marketing, managing email hard bounces is crucial for maintaining sender reputation and ensuring campaign success. Microsoft Dynamics 365 Customer Insights - Journeys automatically adds hard-bounced emails to a suppression list, temporarily halting sends to invalid addresses. However, businesses are seeking more comprehensive solutions to not only suppress these emails but to actively fix or validate them, ensuring continued communication with their customers.
A deeper review of Microsoft documentation shows that once an email address is added to the suppression list, it’s automatically removed after its expiration period, allowing emails to be sent again. The more an address is suppressed, the longer the suppression period grows.

I believe the suppression list alone is not a sufficient solution because, after the expiration period, these emails are reactivated and may bounce again if the underlying issue isn’t resolved. This leads to repeated hard bounces for the same email, ultimately affecting deliverability.
To tackle this problem, I have implemented the following outlined strategy to effectively manage hard bounces:
Automatically opting out emails that experience hard bounces.
Providing customers with a web-form to easily submit their new email addresses.
Sending SMS and/or push notifications to inform customers of the issue and request updated email addresses.
Automatically trigger a consent email for the newly updated email addresses.
Step 1: Create a segment to capture contacts with hard bounces
First, we need to create a segment to capture contacts with a hard-bounced email. This segment will be used in the next steps, where we will build a marketing journey to send SMS and/or push notifications to these contacts, and opt them out of email communication consents.
From your Customer Insights Journeys app, navigate to Segments and create a new segment targeting Contacts
For the filter, navigate to the Behavioral elements > expand the Email > select Bounced
Press on the group > add Bounce Type as a new filter, and set the following values:
Email contains data
Bounce Type is Hard

For the filter period (at least once in the last [time period]), you need to set the date you want to start capturing and handling the hard bounces with the new automated way.

Step 2: Build a Trigger & Flow to automatically opt-out hard bounced emails
I believe Microsoft's solution of adding hard-bounced emails to a suppression list with an expiration date is insufficient. Therefore, this solution aims to go a step further by automatically opting out hard-bounced emails using a Power Automate flow.
First, we need to create a trigger, as it will be used as an action in the Power Automate flow, which will then be added to a Marketing Journey.
Navigate to the Trigger area and create a new trigger with action When a customer interacts with a website/app.
Set the data type to Contacts without adding any attributes
Press Next for Step 2 & 3, as there’s no need to copy any code or snippet, and then set it as Ready to Use.


Once the trigger is created, it’s time to build the Power Automate flow. The purpose of this flow is to opt out the email consent for any new contact that enters the segment we created in Step 1.
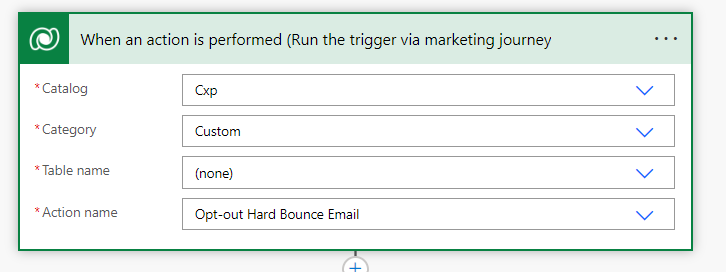
From Power Automate App, create a new cloud flow and select the following dataverse trigger When an action is Performed
Set the following details in the Trigger step, and in the Action Name make sure to select the Trigger we previously created
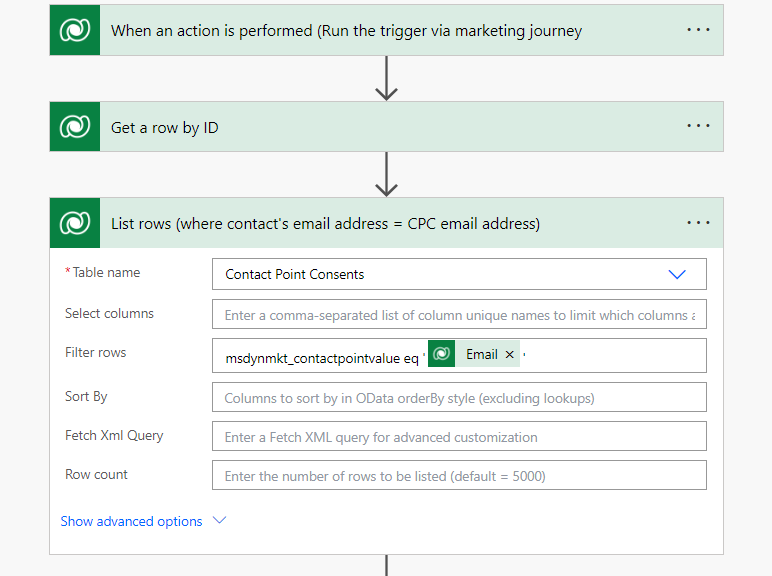
Insert a new step and select the following dataverse action Get a row by ID. This will be used to retrieve the Email column from the Contacts table.
Make sure to set the Row ID to the Profile ID of the previous action “ActionInputs msdynmkt_profileid”


Insert a new step and select List rows dataverse action. This will be used to list all the contact point consents, and we will add a filter to make sure it matches the contact’s email address. Select the following in the step:
Table name = Contact Points Consents
Filter rows = msdynmkt_contactpointvalue eq ‘Email’
Contact point value is the email set in the contact point consent table,
whereas Email is the email address of the contact (selected from previous step)

Now we need to add a condition, to validate if the contact’s email has an existing consent in the Contact Point Consent table, or not, so we can build action based on the results. Therefore, a condition step is needed with an Empty expression:
Press on the choose a value > navigate to Expression > select Empty expression > add ( ) to the Empty expression > then add the value as dynamics content from the “List Rows” step (value of the Contact Point Consent):
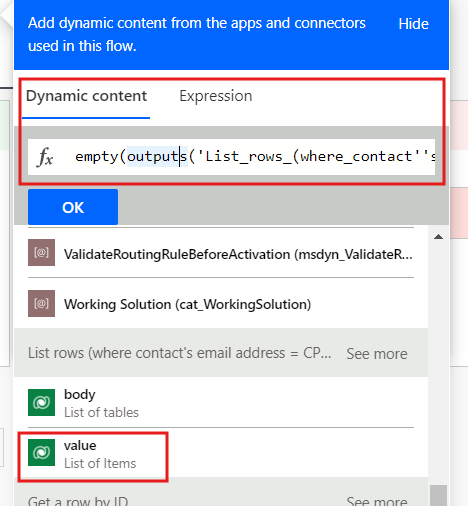
b. Keep the operator = is equal to, and the write “false” in the expected value


6. Now the final step is to apply an action based on the results of the condition.
If Yes (contact’s email has a consent) > we need to update the consent status to Opt-Out
If No (contact’s email has no existing consent) > no action to be taken (terminate the flow run as “Succeeded)


And that’s it, now the PA flow is configured and ready to be included in a Marketing Journey.
Step 3: Building a web-form for submitting the new email
After opting out email consents, we need to communicate with the related contacts via SMS and/or push notifications to request updated email addresses. This is where web forms are essential. We'll create a simple marketing form that allows contacts to submit their new email addresses, and include the form's URL in the SMS and push notifications.
To achieve this solution, we need to implement 3 minor steps:
Create a new field on the contact table. This will be used to store the new email.
(I won’t be showing this in details since it is an easy step)
Creating a Marketing Form, as follows:
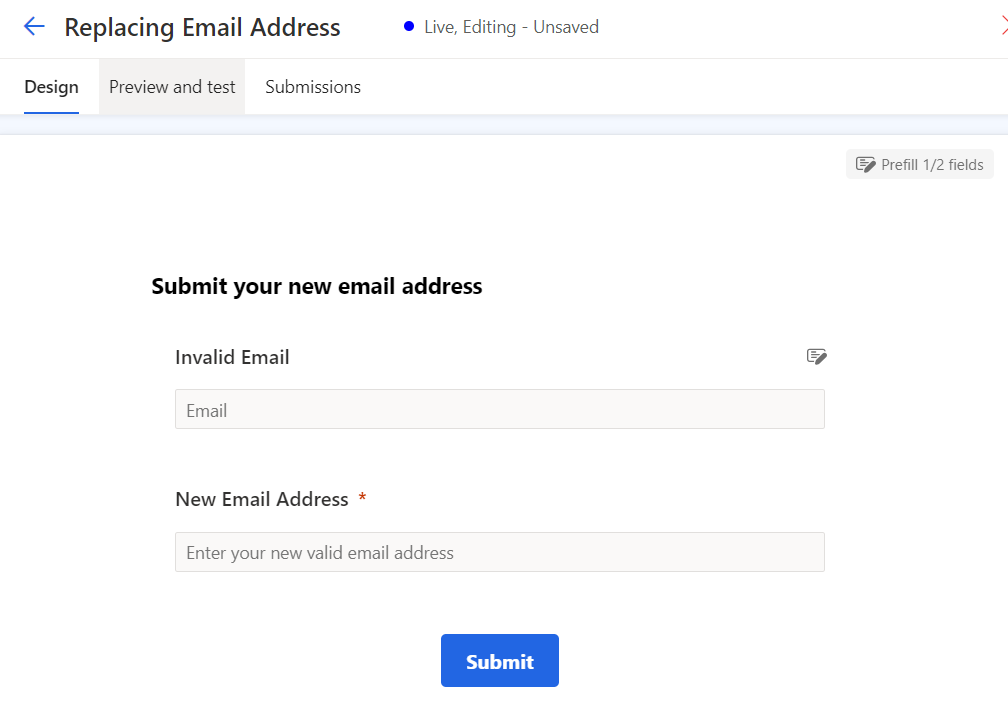
You can choose whether to display the old/invalid email address on the form. In my case, I chose to include it and made it read-only (using the HTML script, as this functionality is not yet supported in real-time forms). Additionally, the publishing method you use will depend on your specific business requirements.
Last step you need, is building a automated flow or an action to do the following:
Sending a verification link to contact’s new email. Since such functionality isn’t natively supported in Dynamics 365, you’ll need to integrate a third-party tool or implement your custom solution for this process.
If email is verified, the same flow/action will replace the old email with the new email value.

Step 4: Create a flow to trigger a consent email for the updated email addresses
Since customer consents are tied to their email addresses (or mobile numbers), these consents are effectively lost when the contact's email changes. Therefore, it's necessary to trigger a new consent email, prompting the customer to opt in again using their updated email address.
In my previous article, I discussed adding a toggle field to the Contacts table that functions as a trigger for a consent email. In this article, I will build on that concept and implement the following Power Automate flow:
Trigger: When a contact’s email address is updated
Action: Switch the toggle field to Yes


If you want to directly send an email to the contact without relying on the toggle field, you need to create a new Trigger and include it in your flow.
Step 5: Prepare your SMS Messages and Push Notifications
In this step, we need to prepare the SMS message and/or push notifications that will be sent to contacts with hard bounce emails.
Ensure that the web form link is included in the SMS template and added to the push notification, with the On-click behavior set to Open in browser.

Step 6: Build a Journey to send SMS and Push Notifications for any new hard bounce
Now it’s time to bring all the pieces we've built together into a single journey.
In this solution, I assume that all contacts have already provided consent for mobile communication. However, if some have not, they will be automatically blocked from the marketing journey, so that’s fine also.
Navigate to the Journey area and create a:
Segment-based journey with the following frequency option “A one-time journey where newly added audience members can start any time”
Select the segment we created in Step 1, choose a starting date and press Create
Add an Action = Activate a customer trigger, and select the flow we built in step 2
Add an action = Text message, and select your SMS template
Add an action = Push notification, and select your push notification template
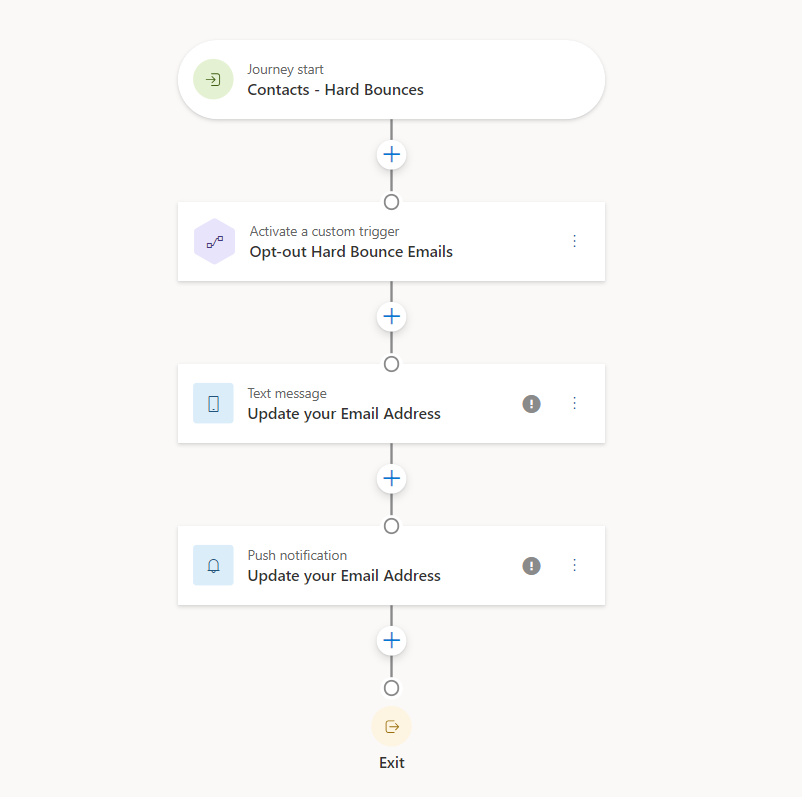
Result: With this journey, we will ensure that any new contact’s email marked as hard bounced is automatically opted out of their consents. They will receive an SMS and push notification with a link directing them to a web-form where they can update their email address. Once their new email is verified, they will receive a follow-up email to reset their consent preferences.

Thank you for reading my article. I hope it provides valuable insights for your Dynamics 365 Marketing implementation. In my next article, I will explore a similar solution tailored for B2B Marketing
This was very useful information and helped me solve the problem I was dealing with, thank you!
Glad to hear that Lynn! thanks for your comment